PICO 4 VR Headset Setup, configuration, and battery
PICO 4 VR Headset Setup, configuration, and battery
- Setup is easy...
- ...but the user account and WLAN cannot be configured via the app.
- The battery lasts for about two hours.
Setting up the Pico 4 is still almost the same as setting up a Quest 2 (review). Supported by videos and step-by-step instructions, the VR headset including the gaming area is quickly set up. Setup requires logging into a Pico account. This is not possible via the app, and neither is setting the Wi-Fi network. At least I do not have to know my payment details by heart - I store them in the VR Assistant app.
Battery performance is on par with Pico Neo 3 Link or Quest 2, lasting about two hours before needing a charge. Unfortunately, Pico only supplied me with a British plug for the novel charger, so I can't say anything about the supposedly fast charging time. It still takes around one-and-a-half to two hours with a normal charger.
Resolution, colors, refresh rate, and color passthrough
- The higher resolution is barely noticeable.
- Colors wash out, and the picture is comparatively dark.
- The picture has an excellent general edge-to-edge clarity, but looks "smeared" in high-contrast scenes or blurred due to reflections.
- God-rays are almost non-existent.
- The screen-door effect is clearly visible because it is not homogeneous, but has "holes".
Pico 4 has a resolution of 2,160 x 2,160 pixels per eye - higher than Pico Neo 3 Link and Quest 2, but the difference is hardly visible in practice. I think I can recognize a slightly better readability when I look closely.
The colors of the LC display look washed out and darker overall in direct comparison with the Quest 2. This is probably due to the new pancake lenses, which are much larger than the previous Fresnel lenses and do not have the typical Fresnel rings.
While God-Rays are almost completely gone, I always have the impression, especially in high-contrast scenes with bright elements, that the lenses are dirty. Bright light reflects on the lenses and creates a glare effect that always bothers me - for example in the menu, where this effect is permanently present. Fortunately, in games, and when I do not concentrate too much on individual elements in the picture, this fades into the background.
By the way, I also removed my glasses for verification to ensure that there are no reflections caused by them. In fact, when I use the Pico 4 without glasses, I see the reflections more clearly. It is possible that reflections inside the lens construction cause this effect, which I perceive as a smeary image.
This is particularly noticeable when I load an app and only the white logo is visible against a black background. If I then move my head, a mirrored copy of the logo moves along in the background.
This also applies to complete menus. If I stand in front of the menu in Walkabout Mini Golf and look into the dark spaces while moving my head, I also see the selection menu small and mirrored in the background. This could be responsible for the blurred image impression during normal use.
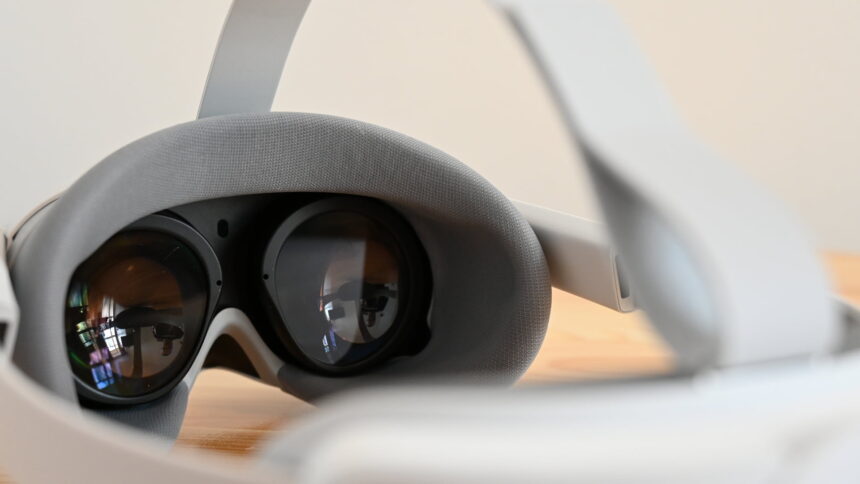
The Pico 4 relies on pancake lenses without a Fresnel cut. This makes the VR headset lighter and narrower. | Image: MIXED
However, there is something else that bothers me. The screen-door effect is clearly visible again, mainly when moving the head slowly. Especially on lighter, monochrome surfaces, I see this fine grid with every head movement and always have the impression that I'm looking through a very thin cloth.
With the Quest 2, I can also see the screen-door effect, but it is less noticeable because it is a homogeneous, fine mesh. The problem with Pico seems to be an imperfectly processed display. Inside the pixel grid, I see irregularly distributed artifacts that look like small, bright, round holes or bubbles in the "fabric" - sometimes just one, sometimes several in a bunch. This automatically makes the picture "bumpy" when moving.
The standard refresh rate is 72 Hz, as was common back on the first Quest. 90 Hz has to be activated in the settings. Meta also takes this step with the Quest Pro - I do not understand this because a higher refresh rate provides a smoother picture and is thus much more convenient.
For a long time, 90 Hz was the gold standard for VR headsets. I am not a fan of abandoning these standards in exchange for other features like longer battery life.
The color passthrough is a step in the right direction, but nothing more. The size ratios and sense of depth don't fit at all. In addition, distortions and bulges constantly move the image. If you have a sensitive stomach, you might get nauseous quickly when trying to walk around with color passthrough.
In my experiment, I was able to walk around the apartment and up and down the stairs without an accident. However, I had to pay close attention due to distorted depth perception.
Text is readable nearby, and operating my PC with the VR headset on worked well enough to make adjustments to the Link software, for example. However, the Pico 4 will not become a mixed reality headset for good passthrough AR in the near future. Maybe software updates involving the tracking cameras will do the trick eventually.
Field of view, sweet spot, and interpupillary distance
- The field of view seems larger due to the reduced distance of the lenses to the eyes - but this is hardly objectively perceptible in practice.
- The sweet spot and image clarity towards the edges are excellent.
- The IPD can be continuously adjusted between 58 and 72 mm.
One advantage of the new pancake lenses is the larger field of view. I don't even discuss the seven or ten degrees bigger field of view that Pico 4 officially claims compared to the Quest 2. Because of the huge, flat lenses, my eyes are much closer to the display than they used to be. As a result, the field of view feels much larger at first glance. This is noticeable in a positive way - as you can easily see from my Pico 4 preview.
However, a direct comparison with the Quest 2 in the same VR scene reveals that the slightly larger field of view is barely noticeable. That is also the reason I consider discussions about numbers in resolutions or field of view that are relatively close to each other to be marketing nonsense and a waste of time. In practice, 250 pixels or five degrees more do not make a significant difference.
The image clarity in the center, the so-called sweet spot, is excellent. The image clarity towards the edges, the so-called edge-to-edge clarity, is even better. While a certain blurriness sets in early on with Quest 2, I can look very far toward the edges on Pico 4 without the image losing significant clarity. This is the biggest advantage of the new VR headset in my opinion.
I enter my interpupillary distance (IPD) in the corresponding dialog, then the lenses automatically adjust. Officially, the headset supports a variable IPD of 62 to 72 mm. Theoretically, I can even go down to 58 mm, but then I run the risk that the motor-adjustable lenses will pinch my nose. A corresponding warning is displayed.
https://mixed-news.com/

Comments
Post a Comment